


Original Creality CR6 SE Hotend Extruder Full Kit Assembled for CR-6 SE CR6 MAX 3D Printer w/Auto Leveling, Back Support Bracket, Heater, Thermistor, Cooling System
- All prices mentioned above are in Indian Rupee.
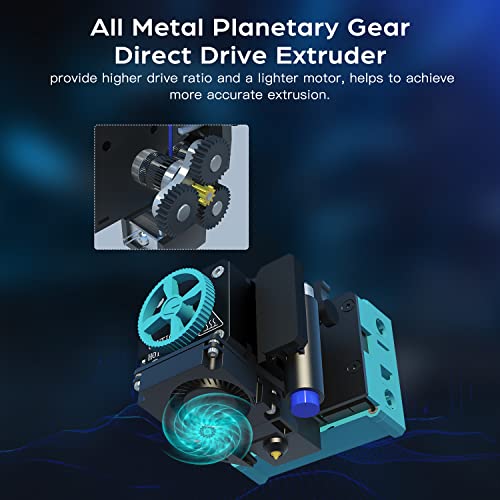
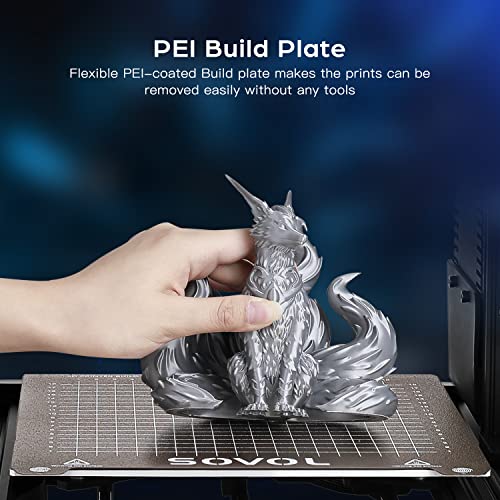
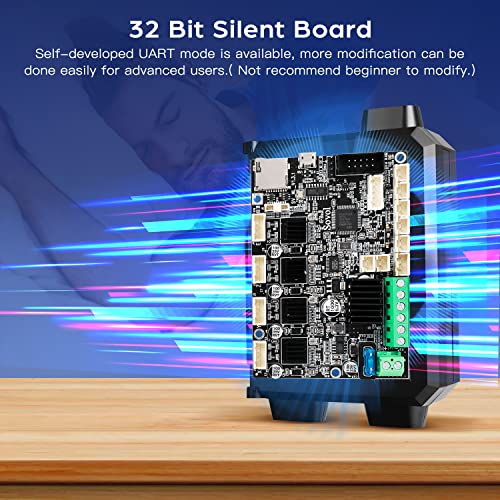
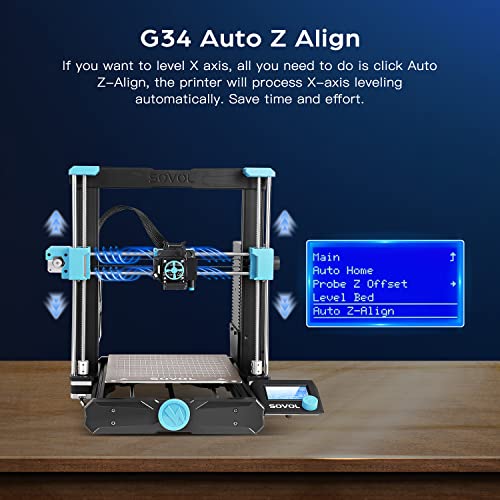
- At amazon.in you can purchase Sovol SV06 3D Printer with All Metal Hotend Planetary Dual Gear Direct Drive Extruder 25-Point Auto Leveling PEI Build Plate 32 Bit Silent Board Printing Size 8.66 * 8.66 * 9.85 inch for only
- The lowest price of Sovol SV06 3D Printer with All Metal Hotend Planetary Dual Gear Direct Drive Extruder 25-Point Auto Leveling PEI Build Plate 32 Bit Silent Board Printing Size 8.66 * 8.66 * 9.85 inch was obtained on June 21, 2026 1:45 am.
Best deal at:  amazon.in
Buy for best price 
Original Creality CR6 SE Hotend Extruder Full Kit Assembled for CR-6 SE CR6 MAX 3D Printer w/Auto Leveling, Back Support Bracket, Heater, Thermistor, Cooling System
Description
- metal shell, high precision, stable operation efficient heating and heat dissipation
- Integrated Design: Brass nozzle heating/cooling system leveling system V pully Fixed wiring port, supper simple installation.
- High Precision Intelligent Leveling: Brand new automatic leveling sensor, high precision andlow energy consumption automatic leveling, accurate data transmission, standard deviation is only 0.005mm.
- More efficient heating and heat dissipation: Advanced thermistor & heating tube assembly, rapid heating. The heatsink adopts a hollow structure, which makes heat dissipation more efficient. Nozzle equipped with a powerful silent cooling fan can increase heat dissipation by 30%. The data comes from simulaiton analysis of Creality Lab.
- Package: 1set Full Assembled Hotend kit with Heater, thermistor , PTFE tube and silicone cover, LED, Cooling Systems like our first photo shows
Additional information
Specification: Original Creality CR6 SE Hotend Extruder Full Kit Assembled for CR-6 SE CR6 MAX 3D Printer w/Auto Leveling, Back Support Bracket, Heater, Thermistor, Cooling System
|
Price History
-
Reviews (10)
10 reviews for Original Creality CR6 SE Hotend Extruder Full Kit Assembled for CR-6 SE CR6 MAX 3D Printer w/Auto Leveling, Back Support Bracket, Heater, Thermistor, Cooling System
Show all
Most Helpful
Highest Rating
Lowest Rating
Add a review
Related Products


Kevin Doodnauth –
The media could not be loaded. Muy fácil de armar, muy fácil de configurar y de realizar el ajuste automático del extrusor.Impresión de gran precisión y con velocidad bastante decente. Estoy muy satisfecho con este producto.Actualización.-Este producto es basura, no lo compren por nada del mundo. Ya llevo 2 motores y planetarios cambiados por completo porque esta porque hace bolas con el filamento y se dañan totalmente.No duran ni 4 impresiones antes de dañarse.Basura de producto.
Walter Umana-Ticas –
The media could not be loaded. This is a brief initial review of the Sovol SV06 Plus.Experience: I’ve owned two 3D printers over 5 or so years. Last printer was the Sovol SV03.Assembly:The printer parts are well packed in the box and are insulated on all sides with dense foam. The assembly instructions in the user manual are very straightforward and well laid out, and the bolts and fittings are separated by assembly step in little bags which makes putting the machine together very easy. The gantry slides onto the base without resistance and I had no issues with fit or hole alignment. I would recommend you plug the screen in prior to putting it in the holder, as the cable is a little short and it can be tough trying to find the right angle.Printing: After assembly, the manual walks you through the initial bed mesh and Z-offset calibration step by step. A benchy and lighthouse STL, as well as the Sovol version of Cura with a settings preset for this printer, are included on the 8gb SD card that comes with the printer. Ignoring the pre-sliced Gcode files on the card, I went ahead and sliced my own local benchy model using the bundled Sovol Cura and hit print. The layout of the touch screen menu, and the limited slicing options in the Sovol Cura (I could not get all settings to show) may feel a little basic for advanced users, but work really well if this is your first printer and you’re trying to get printing right away. I was very pleased with the Benchy model quality when it finished printing (attached photos). I’m tired of finding little tugboats all over my house, so I printed a more complicated beefy charmander model using supports, which also printed very nicely, with clean support removal, some underextrusion on the thinner supports, and clean overhangs. Printing quality is really solid out of the box with these most basic settings, and I only expect it to improve with further tuning and calibration.Impressions and features:-The default settings for movement feel a little quick and jerky leading to some very slight ghosting on parts using the default slicer profile-Some of the rod bearings sound a little crunchy and noisy out of the box. A tube of metal grease is included (remember to lube up your leadscrews and rods!) but a proper lubing would require machine disassembly, so it would be nice if these could come better lubricated and quieter in the box.-the instructions are well done and even include a printing suggestions page and a reference page for all the cable connections so you can make sure everything that needs to be plugged in is plugged in-the pivoting filament sensor is very cool and a big improvement from the stiff, fixed sensor that was on the SV03-from what I’ve heard the built in inductive probe is more accurate by design than BL/CR touch style probes-the build plate looks really cool and feels really high quality. The flexible plate allows for a bigger plate while saving the weight that a big pane of tempered glass would have added (another SV03 issue) I look forward to seeing big prints pop off the plate instead of having to fight them with a spatula-the fixed bed /probe combo makes this a great printer for beginners since it’s one less finicky thing they’d have to worry about prior to printing-the Sovol Cura is great for printing right away after assembly to make sure everything is working. Beginners will appreciate not having to worry about their slicer settings right at the beginning. I hope that a machine preset for the plus will be added to mainline Cura soon.
Ken Keene –
The media could not be loaded. This is a brief initial review of the Sovol SV06 Plus.Experience: I’ve owned two 3D printers over 5 or so years. Last printer was the Sovol SV03.Assembly:The printer parts are well packed in the box and are insulated on all sides with dense foam. The assembly instructions in the user manual are very straightforward and well laid out, and the bolts and fittings are separated by assembly step in little bags which makes putting the machine together very easy. The gantry slides onto the base without resistance and I had no issues with fit or hole alignment. I would recommend you plug the screen in prior to putting it in the holder, as the cable is a little short and it can be tough trying to find the right angle.Printing: After assembly, the manual walks you through the initial bed mesh and Z-offset calibration step by step. A benchy and lighthouse STL, as well as the Sovol version of Cura with a settings preset for this printer, are included on the 8gb SD card that comes with the printer. Ignoring the pre-sliced Gcode files on the card, I went ahead and sliced my own local benchy model using the bundled Sovol Cura and hit print. The layout of the touch screen menu, and the limited slicing options in the Sovol Cura (I could not get all settings to show) may feel a little basic for advanced users, but work really well if this is your first printer and you’re trying to get printing right away. I was very pleased with the Benchy model quality when it finished printing (attached photos). I’m tired of finding little tugboats all over my house, so I printed a more complicated beefy charmander model using supports, which also printed very nicely, with clean support removal, some underextrusion on the thinner supports, and clean overhangs. Printing quality is really solid out of the box with these most basic settings, and I only expect it to improve with further tuning and calibration.Impressions and features:-The default settings for movement feel a little quick and jerky leading to some very slight ghosting on parts using the default slicer profile-Some of the rod bearings sound a little crunchy and noisy out of the box. A tube of metal grease is included (remember to lube up your leadscrews and rods!) but a proper lubing would require machine disassembly, so it would be nice if these could come better lubricated and quieter in the box.-the instructions are well done and even include a printing suggestions page and a reference page for all the cable connections so you can make sure everything that needs to be plugged in is plugged in-the pivoting filament sensor is very cool and a big improvement from the stiff, fixed sensor that was on the SV03-from what I’ve heard the built in inductive probe is more accurate by design than BL/CR touch style probes-the build plate looks really cool and feels really high quality. The flexible plate allows for a bigger plate while saving the weight that a big pane of tempered glass would have added (another SV03 issue) I look forward to seeing big prints pop off the plate instead of having to fight them with a spatula-the fixed bed /probe combo makes this a great printer for beginners since it’s one less finicky thing they’d have to worry about prior to printing-the Sovol Cura is great for printing right away after assembly to make sure everything is working. Beginners will appreciate not having to worry about their slicer settings right at the beginning. I hope that a machine preset for the plus will be added to mainline Cura soon.
miguel angel hernandez –
Excelente producto, de alta calidad y bajo precio. Lo recomiendo ampliamente.
Ron D. –
I was tired of 3D printed mounts being unsturdy and warping. Went looking for a metal mount and found this. Price was so good and I had to give it a try. I was very happy with the finish at first and the pre drilled and taped holes for fan mount and bl touches. There aren’t alot of files available so I had to make my own. It was fairly easy to mount dual blower fans and bl touch. Mounts to most Ender 3s nice. Should work on an ender 5 plus as well. Now I can print high temp without worry
Walter Umana-Ticas –
The media could not be loaded. Short(ish) version: I’m a medium-level 3D printing enthusiast, 3 years of mixed experience/results with an Ender 3 since 2020. I picked up the SV01 Pro in October 23 and it was so easy to build and use, but I wanted more build area, plus a second printer so I could run concurrent print jobs. I did a fair bit of research and determined the SV06 PLUS to be a solid value. Purchased this guy November of 23, and holy cow was that it a good decision. I mean, here are some of the important boxes this printer checks for me: 1) More build volume 2) Higher print speed capable 3) Self-leveling (not perfect but shockingly good!) 4) Pause/Resume when it runs out of filament (more details below how this saved my six-day print) and 5) In general terms, for my uses, this was a wonderful next step in my 3D printing hobby. Honestly, I can say my new printers have made printing FUN again, and I get to spend time printing again instead of constantly calibrating in between prints.More details: I’m not here to trash Enders, especially since my Ender got me into the hobby (January 2020). I did however eventually get tired of the bed leveling, failed prints, and constant babysitting. To tell the truth, I was hardly printing any more come 2023. My coworker was talking about this SV01 Pro he got cheap and how reliable it was. I said why not, got myself an SV01 and was just instantly having a GREAT time! My only problem – I had the desire to print larger stuff. I joined the Sovol groups on Reddit and FB, and did a lot of reading. The clear consensus was that the SV06+ is one of the best bang for the buck printers available in general. I chose the standard (read: non Klipper) model. Klipper is a whole other (and interesting) topic but I’m not looking to address that in this context, I may tinker with it on my Raspberry Pi later, but I’m just running things stock. So the SV06 arrives, and within about 30 minutes I had assembled it and started the leveling process. As soon as that was done I connected my Raspberry Pi with OctoPi and set up a printer profile so I could print from my PC instead of using the SD slot. I’ll go ahead and mention the con I have with this printer because this is where you’ll notice it too: The power supply has a significantly loud fan. It’s not a deal breaker for my situation because my printers are in the basement, but trust me about the noise of the power supply in case that would be a problem for you.Anyway, It’s been about 4-5 weeks of non stop printing for me. I’ve shared several photos, and one video for this review. I printed a cool marble track model but should have scaled it up in size because it would only fit smaller ball bearings. Turns out the SV06 was big enough to increase the model to a size where I could use regular marbles! The model took up most of the build volume on the SV06 and would provide a great stress test. This beast was a 6-day print and on day 4 when the spool of filament ran out, the filament sensor on the printer paused it automatically, moving the hot end to the side so I could mount a new spool and load the filament. Then I hit resume (holding my breath because I hadn’t actually tried this before) and it just picked up where it left off. If you check my video, you can see the finished product which is pretty cool – it has an Archimedes screw that lifts the marbles back up where they randomly fall out to the 4 different tracks and down again.Summary – I hope this helps someone that’s on the fence! Potential buyers should be aware of the loud fan on the power supply, but I can sincerely recommend my SV06 plus based on my experience. It’s fast, it has been reliable, it successfully printed a monster print for me (hopefully the first of many), and it’s been easy and fun to use. I still don’t know if I’d call it a “beginner” printer, but I’ve been teaching my son and he picked it up right away. We’re having a blast printing organizers and accessories for a bunch of our favorite tabletop games. Two thumbs up!
Walter Umana-Ticas –
I feel like I’ve spent enough hours in the last two months 3D Printing as much as I could, including while sleeping, to review this product.If you’re someone new in the space, you may have been looking at budget options to minimize how much you should spend on a printer. After all, there’s a good chance you have neither the habit or jargon of this new space. The installation process of the SV06 is straight forward and direct. It probably is as easiest as it gets with 3D Printing since most of the assembly comes pre-assembled out of the box.When it comes to functionality, I think the Cura software they include at the start is a fine starting point, but I would eventually pivot towards either a proper Cura if one wants to stay on there, or try out one of the many alternatives. I’ve settled for Orcaslicer when it comes to what I’m doing with mine. Navigating the menus on the included screen+knob is as simple as it gets, just like many of the cheap 3D printers.The print quality is rather decent when it comes to what it can do. At the price point of 170$ that I’ve paid of it’s fairing well. There are a couple of changes that I do recommend doing though. The cooling fans could be upgraded to improve the airflow, improve printing quality and avoid possibilities for clogging issues. There also is the fact that the adapter for the fan cooling my prints began to warp when I switched over to printing PETG and ABS. One thing to keep in mind is that some may get a bed that’s a little warped. The variance can be small, but there’s customers out there that got some pretty warped PEI sheets.So, why the SV06? Well, you might have been eye-ing something like an Ender printer (Or one of the many “clones”). And honestly, unless they were cheap enough and came with a couple of upgrades, it’s just better off paying the small premium and acquire this instead. The upgrades that come with the printer are a nice plus and have been really useful for multiple of my prints. The linear rail system is a nice plus for durability. Unless you really wanted to get faster print speeds out of the box or a large printing surface, you can’t go wrong with this unit.At the moment, I’ve modified mine a couple of times and I’m still adding new things onto it to improve and push it further. It’s been helping me out with some projects and making me try new things.
Jacqueline Miller –
You do have to be somewhat handy to install this. Takeoff the bottom wheel of the old one to remove it, take off the bottom wheel of the new one to install it. To get the screw back into the washer and the nut you will need a flat wrench and maybe a pair of tweezers to hold the washer. In order to access it I had to unscrew two screws that were holding the fan cover on, and then I unscrewed the next two screws that held the hot end. Product came brand new and completely revived my printer. This was money well spent.
JBF –
Compré el producto porque, en una impresión, el plástico no se adhirió a la base y se formó una bola de PLA que, al quitarla rompió los cables de llegada de alimentación del extrusor, con lo que el circuito quedó abierto y no calentaba ni base ni extrusor. El producto, al llegar, parecía muy correcto, bien presentado, embalado, con todas sus piezas… perfecto. Al montarlo y encender la máquina para comprobar su funcionalidad, la pantalla principal fallaba, no cargaba los datos: la barra de carga de datos no iniciaba. En cambio, si desconectaba el bus principal de datos que llega a la parte superior del conjunto extrusor, sí cargaba, pero, evidentemente, no hacía nada más. Aparecía el menú pero no podía avanzar en ningún caso.Total, que desmonté el extrusor del conjunto y lo conecté al conjunto antiguo. Entonces sí funcionó.El producto, en conjunto, no funcionó. En cambio, por piezas, sí. Me salió un poco más caro pero solucioné el problema.